How to replace a domain in the Remnawave panel
This guide will help you change the current domain of the Remnawave panel (for example, olddomain.com) to a new one (for example, newdomain.com). You will learn how to generate a new SSL certificate and update configuration files. If you are using the panel together with a node, additional steps are provided at the end.
Variant only panel
Section titled “Variant only panel”Generating a new SSL certificate
To use the new domain, you need to generate a new SSL certificate using the script
-
Run the script:
Terminal window remnawave_reverse -
Select option 8:
Domain certificate management -
In the submenu select option 2:
Generate new certificates for another domain -
Enter the new domain, for example, newdomain.com
-
Select the method of obtaining the certificate: ACME or Cloudflare
-
After successful execution, the certificates for the new domain will appear in the following directory:
Directory/etc/letsencrypt/ - root directory of certificates
Directorylive
Directorynewdomain.com - new domain
- fullchain.pem
- privkey.pem
Directoryolddomain.com - old domain
- fullchain.pem
- privkey.pem
Updating configuration files
After generating the certificate, update the domain in the Remnawave panel configuration files.
-
Open the
.envfile for editing:Terminal window nano /opt/remnawave/.env -
Find the line with the current domain:
.env FRONT_END_DOMAIN=olddomain.com -
Replace it with the new domain:
.env FRONT_END_DOMAIN=newdomain.com -
Open the
docker-compose.ymlfile:Terminal window nano /opt/remnawave/docker-compose.yml -
Find the
remnawave-nginxservice and update the paths to the certificates, replacingolddomain.comwithnewdomain.com:docker-compose.yml remnawave-nginx:image: nginx:1.28container_name: remnawave-nginxhostname: remnawave-nginxrestart: alwaysvolumes:- ./nginx.conf:/etc/nginx/conf.d/default.conf:ro- /etc/letsencrypt/live/newdomain.com/fullchain.pem:/etc/nginx/ssl/newdomain.com/fullchain.pem:ro- /etc/letsencrypt/live/newdomain.com/privkey.pem:/etc/nginx/ssl/newdomain.com/privkey.pem:ronetwork_mode: hostdepends_on:- remnawave- remnawave-subscription-pagelogging:driver: 'json-file'options:max-size: '30m'max-file: '5' -
Open the
nginx.conffile:Terminal window nano /opt/remnawave/nginx.conf -
Find the
serverblock and replaceolddomain.comwithnewdomain.com:nginx.conf server {server_name newdomain.com;listen 443 ssl;http2 on;ssl_certificate "/etc/nginx/ssl/newdomain.com/fullchain.pem";ssl_certificate_key "/etc/nginx/ssl/newdomain.com/privkey.pem";ssl_trusted_certificate "/etc/nginx/ssl/newdomain.com/fullchain.pem";add_header Set-Cookie $set_cookie_header;location / {if ($authorized = 0) {return 444;}proxy_http_version 1.1;proxy_pass http://remnawave;proxy_set_header Host $host;proxy_set_header Upgrade $http_upgrade;proxy_set_header Connection $connection_upgrade;proxy_set_header X-Real-IP $remote_addr;proxy_set_header X-Forwarded-For $proxy_add_x_forwarded_for;proxy_set_header X-Forwarded-Proto $scheme;proxy_set_header X-Forwarded-Host $host;proxy_set_header X-Forwarded-Port $server_port;proxy_send_timeout 60s;proxy_read_timeout 60s;}} -
Restart the services to apply the changes:
Terminal window cd /opt/remnawave && docker compose down && docker compose up -d
Variant only panel + node
Section titled “Variant only panel + node”Generating a new SSL certificate
To use the new domain, you need to generate a new SSL certificate using the script
-
Run the script:
Terminal window remnawave_reverse -
Select option 8:
Domain certificate management -
In the submenu select option 2:
Generate new certificates for another domain -
Enter the new domain, for example, newdomain.com
-
Select the method of obtaining the certificate: ACME or Cloudflare
-
After successful execution, the certificates for the new domain will appear in the following directory:
Directory/etc/letsencrypt/ - root directory of certificates
Directorylive
Directorynewdomain.com - new domain
- fullchain.pem
- privkey.pem
Directoryolddomain.com - old domain
- fullchain.pem
- privkey.pem
Updating configuration files
After generating the certificate, update the domain in the Remnawave panel configuration files.
-
Open the
.envfile for editing:Terminal window nano /opt/remnawave/.env -
Find the line with the current domain:
.env FRONT_END_DOMAIN=olddomain.com -
Replace it with the new domain:
.env FRONT_END_DOMAIN=newdomain.com -
Open the
docker-compose.ymlfile:Terminal window nano /opt/remnawave/docker-compose.yml -
Find the
remnawave-nginxservice and update the paths to the certificates, replacingolddomain.comwithnewdomain.com:docker-compose.yml remnawave-nginx:image: nginx:1.28container_name: remnawave-nginxhostname: remnawave-nginxnetwork_mode: hostrestart: alwaysvolumes:- ./nginx.conf:/etc/nginx/conf.d/default.conf:ro- /etc/letsencrypt/live/newdomain.com/fullchain.pem:/etc/nginx/ssl/newdomain.com/fullchain.pem:ro- /etc/letsencrypt/live/newdomain.com/privkey.pem:/etc/nginx/ssl/newdomain.com/privkey.pem:ro- /dev/shm:/dev/shm:rw- /var/www/html:/var/www/html:rocommand: sh -c 'rm -f /dev/shm/nginx.sock && nginx -g "daemon off;"'depends_on:- remnawave- remnawave-subscription-pagelogging:driver: 'json-file'options:max-size: '30m'max-file: '5' -
Open the
nginx.conffile:Terminal window nano /opt/remnawave/nginx.conf -
Find the
serverblock and replaceolddomain.comwithnewdomain.com:nginx.conf server {server_name newdomain.com;listen unix:/dev/shm/nginx.sock ssl proxy_protocol;http2 on;ssl_certificate "/etc/nginx/ssl/newdomain.com/fullchain.pem";ssl_certificate_key "/etc/nginx/ssl/newdomain.com/privkey.pem";ssl_trusted_certificate "/etc/nginx/ssl/newdomain.com/fullchain.pem";add_header Set-Cookie $set_cookie_header;location / {error_page 418 = @unauthorized;recursive_error_pages on;if ($authorized = 0) {return 418;}proxy_http_version 1.1;proxy_pass http://remnawave;proxy_set_header Host $host;proxy_set_header Upgrade $http_upgrade;proxy_set_header Connection $connection_upgrade;proxy_set_header X-Real-IP $remote_addr;proxy_set_header X-Forwarded-For $proxy_add_x_forwarded_for;proxy_set_header X-Forwarded-Proto $scheme;proxy_set_header X-Forwarded-Host $host;proxy_set_header X-Forwarded-Port $server_port;proxy_send_timeout 60s;proxy_read_timeout 60s;}location @unauthorized {root /var/www/html;index index.html;}} -
Run the script remnawave_reverse
Terminal window remnawave_reverse -
Select option 3:
Panel/node management -
Select option 6:
Access to the panel through port 8443 (only for panel + node) -
Go to the browser address that the script provided
-
Enter the Remnawave panel and go to the Nodes —> Management section
-
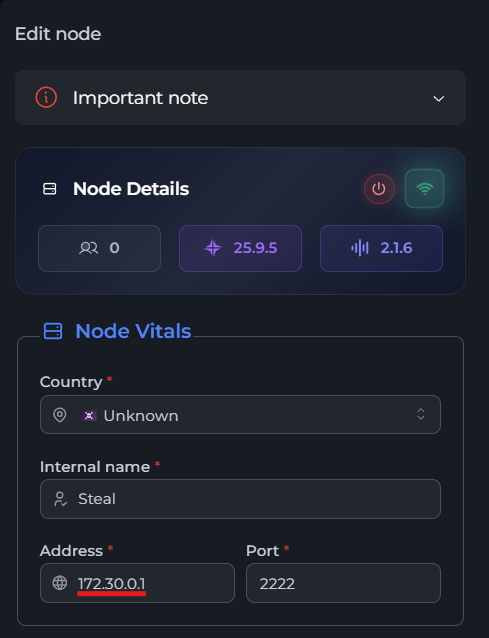
Select your node (Steal)
-
Change the Address field to 172.30.0.1

-
Click Save
-
Go to the Hosts —> Your Host section
-
In the Address field enter the new domain, for example
newdomain.com -
Click Save
-
Go to the Profiles —> Your profile (StealConfig) section
-
Change “serverNames” to the new domain, for example
newdomain.com -
Click Save
-
Close access to port 8443 through the remnawave_reverse script
Terminal window remnawave_reverse -
Restart the services:
Terminal window cd /opt/remnawave && docker compose down && docker compose up -d
Checking the result
Section titled “Checking the result”-
Open the browser and go to the new domain (don’t forget about cookies):
Terminal window https://newdomain.com/auth/login?MdAGAnCL=ExnqGvcX -
Make sure the Remnawave panel loads correctly and the SSL certificate works.
-
If errors occur, check the logs:
Terminal window cd /opt/remnawave && docker compose logs -f -
If the panel does not open, make sure that the DNS records for
newdomain.comare updated and point to your server.
