Replacing default nginx with SWAG (Secure Web Application Gateway) and configuring it for Remnawave
Это содержимое пока не доступно на вашем языке.
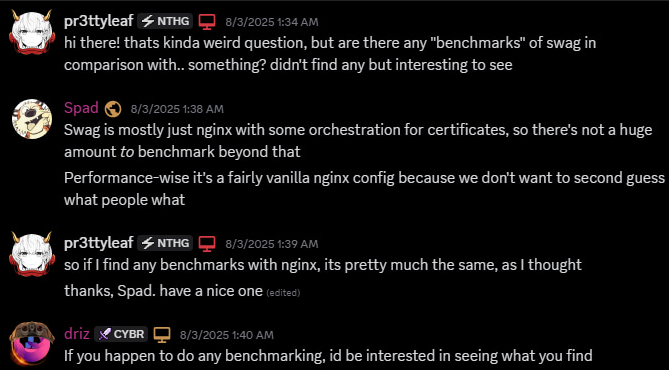
First, you need to decide whether you want to use SWAG or stick with the default nginx configuration. SWAG (Secure Web Application Gateway) is a popular and easy choice for reverse proxy setups, especially when you’ve got a lot of stacks/containers to manage. It comes with built-it cert renewal, templates for various containers, which are a bit changed for beginner-friendly experience. SWAG is same nginx you familiar with (watch the pic below), but with some extra features and easier configuration.

Installing SWAG for panel only
Section titled “Installing SWAG for panel only”-
Create a directory for SWAG.
Terminal window mkdir /opt/swag -
Create a docker compose file.
Terminal window nano docker-compose.ymlswag:image: lscr.io/linuxserver/swag:latestcontainer_name: swagcap_add:- NET_ADMINenvironment:- PUID=1000- PGID=1000- TZ=Etc/UTC- URL=domain.com- VALIDATION=dns- SUBDOMAINS=wildcard- DNSPLUGIN=cloudflare- PROPAGATION=60- SWAG_AUTORELOAD=true# - DISABLE-F2B=true #optionalvolumes:- /path/to/swag:/configports:- 443:443- 80:80 #optionalrestart: unless-stoppednetworks:- remnawave-networknetworks:remnawave-network:name: remnawave-networkdriver: bridgeexternal: trueI guess optional, but can be added
logging:driver: 'json-file'options:max-size: '30m'max-file: '5' -
Generate a Cloudflare API token with
DNS:Read,DNS:Editpermissions todomain.comand copy the token. -
Edit
/path/to/swag/dns-conf/cloudflare.ini, delete everything and paste the following with your token:dns_cloudflare_api_token = token -
Stop remnawave stack, delete nginx section in
/opt/remnawave/docker-compose.ymland restart the stack.Terminal window cd /opt/remnawave && docker compose down -
Start swag’s stack and monitor logs, we’ll need them in a second.
Terminal window cd /opt/swag && docker compose up -d && docker compose logs -f -tIn case you’ve done everything right “Server ready.” will pop up in logs and make sure that
domain.comshows the welcome page with a valid certificate. But we also need logs for monitoring autoreload logs in case you’ve done mistakes in proxy-conf. -
Don’t forget to remove all related crontab entries for cert renewal as SWAG will handle it for you.
Terminal window crontab -e
Configuring SWAG
Section titled “Configuring SWAG”Now we need to implement the nginx configuration we had for SWAG to work with remnawave panel & nodes.
-
Copy template for remnawave
Terminal window cd /path/to/swag/config/nginx/proxy-confscp _template.subdomain.conf.sample remnawave.subdomain.conf -
Edit the configuration file
Terminal window nano remnawave.subdomain.conf -
If you want, you may delete everything in the file and paste the following:
map $http_cookie $auth_cookie {default 0;"~*abcdEfgH=IJKlmnoPq" 1;}map $arg_abcdEfgH $auth_query {default 0;"IJKlmnoPq" 1;}map "$auth_cookie$auth_query" $authorized {"~1" 1;default 0;}map $arg_abcdEfgH $set_cookie_header {"IJKlmnoPq" "abcdEfgH=IJKlmnoPq; Path=/; HttpOnly; Secure; SameSite=Strict; Max-Age=31536000";default "";}server {listen 443 ssl;server_name panel.*;include /config/nginx/ssl.conf;client_max_body_size 0;add_header Set-Cookie $set_cookie_header;location / {if ($authorized = 0) {return 444;}include /config/nginx/proxy.conf;include /config/nginx/resolver.conf;set $upstream_app remnawave;set $upstream_port 3000;set $upstream_proto http;proxy_pass $upstream_proto://$upstream_app:$upstream_port;}}server {listen 443 ssl;server_name subscription.*;include /config/nginx/ssl.conf;client_max_body_size 0;location / {include /config/nginx/proxy.conf;include /config/nginx/resolver.conf;set $upstream_app remnawave-subscription-page;set $upstream_port 3010;set $upstream_proto http;proxy_pass $upstream_proto://$upstream_app:$upstream_port;}location @redirect {return 404;}}You may get confused as a lot of strings are gone, that’s because some parameters such as
upstream, headers and others are already present in SWAG’sproxy.confandssl.conf, so you don’t need to repeat them. If you want to add some headers, you add them back from/opt/remnawave/nginx.conf. -
Navigate to
/path/to/swag/config/nginx/site-confsand editdefaultfile.# main server blockserver {listen 443 ssl default_server;server_name _;ssl_reject_handshake on;include /config/nginx/ssl.conf;
Securing SWAG
Section titled “Securing SWAG”Fail2ban / Crowdsec
Section titled “Fail2ban / Crowdsec”Crowdsec and Fail2Ban can prevent brute-force attacks by monitoring the logs of apps and banning IPs that fail multiple login attempts.
SWAG comes with Fail2Ban pre-configured with a few basic protections, you can fine-tune it specifically for your apps, or disable it and set up Crowdsec instead.
Crowdsec
Section titled “Crowdsec”Crowdsec is a free, open-source and collaborative IPS; it’s like fail2ban but you share your bans with all of the other users to try and pre-emptively block malicious hosts.
Follow this blog post to set it up in SWAG.
Fail2ban
Section titled “Fail2ban”Fail2Ban is an intrusion prevention software that protects external applications from brute-force attacks. Attackers that fail to login to your applications a certain number of times will get blocked from accessing all of your applications.
Fail2Ban looks for failed login attempts in log files, counts the failed attempts in a short period, and bans the IP address of the attacker.
Follow this guide to set it up in SWAG.
Configuring other services
Section titled “Configuring other services”As already said, SWAG has a lot of preset reverse proxy config files are added for popular apps. See the README.md file under /config/nginx/proxy_confs for instructions on how to enable them. The preset confs reside in and get imported from this repo.
Read the docs here.
